
planning模块(4)-参考线的平滑 上一篇已经介绍了创建path的过程
bool ReferenceLineProvider::SmoothRouteSegment(const RouteSegments& segments,
                                               ReferenceLine* reference_line) {
  hdmap::Path path(segments);
  return SmoothReferenceLine(ReferenceLine(path), reference_line);
}
SmoothReferenceLine函数
GetAnchorPoints函数
uniform_slice函数
void ReferenceLineProvider::GetAnchorPoints(
    const ReferenceLine& reference_line,
    std::vector<AnchorPoint>* anchor_points) const {
  CHECK_NOTNULL(anchor_points);
  const double interval = smoother_config_.max_constraint_interval();
  int num_of_anchors =
      std::max(2, static_cast<int>(reference_line.Length() / interval + 0.5));
  std::vector<double> anchor_s;
  common::util::uniform_slice(0.0, reference_line.Length(), num_of_anchors - 1,
                              &anchor_s);
void uniform_slice(const T start, const T end, uint32_t num,
std::vector<T>* sliced) {
if (!sliced || num == 0) {
return;
}
const T delta = (end - start) / num;
sliced->resize(num + 1);
T s = start;
for (uint32_t i = 0; i < num; ++i, s += delta) {
sliced->at(i) = s;
}
sliced->at(num) = end;
}主要是每间隔0.25米进行采样,然后获取到所有采样点在参考线上的纵向距离存入anchor_s中,max_constraint_interval来自配置文件
modules/planning/planning_component/conf/discrete_points_smoother_config.pb.txt,默认是0.25m
GetAnchorPoint函数
  for (const double s : anchor_s) {
    AnchorPoint anchor = GetAnchorPoint(reference_line, s);
    anchor_points->emplace_back(anchor);
  }
上面逻辑就是为所有采样点构建锚点信息
GetReferencePoint函数
GetIndexFromS函数
这个函数的作用是返回给定位置 s 所对应的路径点的索引,以及该路径点到s这个点的距离,这个函数中last_point_index_与上一篇planning模块(4)-参考线的平滑 中介绍的InitPointIndex函数相关,没有印象的再回过头看一下
const int sample_id = static_cast<int>(s / kSampleDistance);
const int next_sample_id = sample_id + 1;
int low = last_point_index_[sample_id];
int high = (next_sample_id < num_sample_points_
                ? std::min(num_points_, last_point_index_[next_sample_id] + 1)
                : num_points_);
last_point_index_:是采样点与相关路径点的索引关系表
low:二分查找的起始索引
high:二分查找的终止索引
下面的逻辑是上一篇InitPointIndex函数的处理逻辑
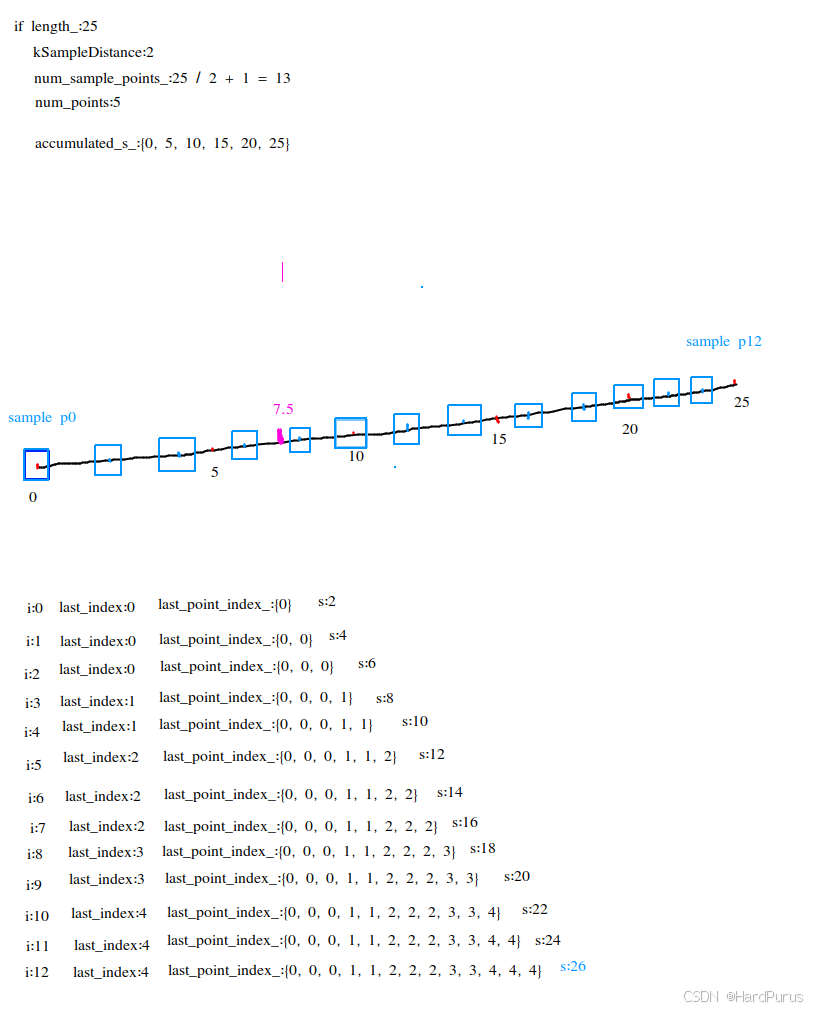
假设s为7.5
sample_id= 7.5 / 2 = 3
next_sample_id = 3 + 1 = 4
low = last_point_index_[sample_id] = last_point_index_[3] = 1
high = 4 < 13 ? std::min(5, last_point_index_[4] + 1) : 5 = 2
  while (low + 1 < high) {
    const int mid = (low + high) >> 1;
    if (accumulated_s_[mid] <= s) {
      low = mid;
    } else {
      high = mid;
    }
  }
  return {low, s - accumulated_s_[low]};
由于不满足while循环条件,return{1, 7.5 - 5 = 2.5}
表示位置s对应的路径点索引是1,路径点到s的距离是2.5m,上面的逻辑就是通过二分查找去查找位置s对应的路径点索引是什么
auto interpolate_index = map_path_.GetIndexFromS(s);

  size_t index = interpolate_index.id;
  size_t next_index = index + 1;
  if (next_index >= reference_points_.size()) {
    next_index = reference_points_.size() - 1;
  }

  const auto& p0 = reference_points_[index];
  const auto& p1 = reference_points_[next_index];

  const double s0 = accumulated_s[index];
  const double s1 = accumulated_s[next_index];
reference_points_是在下面位置构造的
bool ReferenceLineProvider::SmoothRouteSegment(const RouteSegments& segments,
                                               ReferenceLine* reference_line) {
  hdmap::Path path(segments);
  return SmoothReferenceLine(ReferenceLine(path), reference_line);
}
p0/p1:当前扩展参考线上point/下一个point对应的ReferencePoint信息
s0/s1:当前扩展参考线上point/下一个point的纵向距离
auto map_path_point = map_path_.GetSmoothPoint(index);const MapPathPoint& ref_point = path_points_[index.id];根据索引获取到参考路径点
const Vec2d delta = unit_directions_[index.id] * index.offset;
    MapPathPoint point({ref_point.x() + delta.x(), ref_point.y() + delta.y()},
                       ref_point.heading());
获取到当前s位置采样点的坐标值,并为此点构建MapPathPoint
if (index.id < num_segments_ && !ref_point.lane_waypoints().empty()) {
      const LaneSegment& lane_segment = lane_segments_to_next_point_[index.id];
      auto ref_lane_waypoint = ref_point.lane_waypoints()[0];
      if (lane_segment.lane != nullptr) {
        for (const auto& lane_waypoint : ref_point.lane_waypoints()) {
          if (lane_waypoint.lane->id().id() == lane_segment.lane->id().id()) {
            ref_lane_waypoint = lane_waypoint;
            break;
          }
        }
        point.add_lane_waypoint(
            LaneWaypoint(lane_segment.lane, lane_segment.start_s + index.offset,
                         ref_lane_waypoint.l));
      }
    }
    if (point.lane_waypoints().empty() && !ref_point.lane_waypoints().empty()) {
      point.add_lane_waypoint(ref_point.lane_waypoints()[0]);
    }
上面逻辑主要是获取车道信息,首先是判断参考路径点是否包含车道信息,当采样点相关的路径点索引所在的车道id与参考路径点的车道id相同,通过参考点新构建的平滑点就使用参考路径点的车道信息
如果没有满足if的条件,导致平滑点 point 没有车道信息(point.lane_waypoints().empty()),但参考点 ref_point 有车道信息(ref_point.lane_waypoints() 不为空),则将参考点的第一个车道信息添加到平滑点中
map_path_point.set_heading(map_path_.unit_directions()[index.id].Angle());计算当前索引所表示的路径点的segment方向上的单位向量的方向角,unit_directions是在上一篇planning模块(4)-参考线的平滑 InitPoints函数中介绍的,如果记不起来了,就回过头看一下.
double Vec2d::Angle() const { return std::atan2(y_, x_); }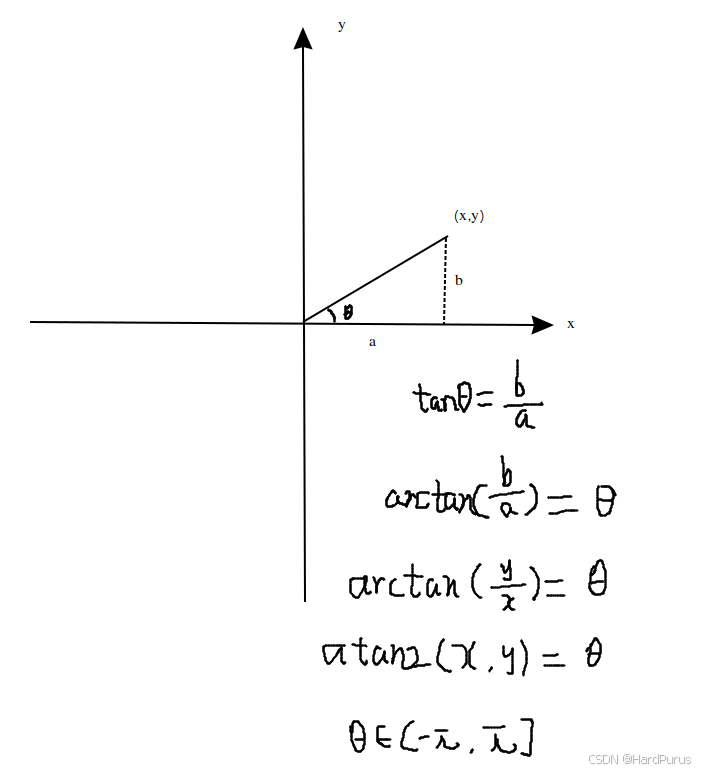
  const double kappa = common::math::lerp(p0.kappa(), s0, p1.kappa(), s1, s);
  const double dkappa = common::math::lerp(p0.dkappa(), s0, p1.dkappa(), s1, s);
通过线性插值,计算采样点位置的曲率和曲率导数
T lerp(const T &x0, const double t0, const T &x1, const double t1,
       const double t) {
  if (std::abs(t1 - t0) <= 1.0e-6) {
    AERROR << "input time difference is too small";
    return x0;
  }
  const double r = (t - t0) / (t1 - t0);
  const T x = x0 + r * (x1 - x0);
  return x;
}
就是按s在s0和s1之间的距离比例,去计算曲率和曲率的导数
return ReferencePoint(map_path_point, kappa, dkappa);最后返回通过采样点构建的ReferencePoint
到这GetReferencePoint函数就介绍完了
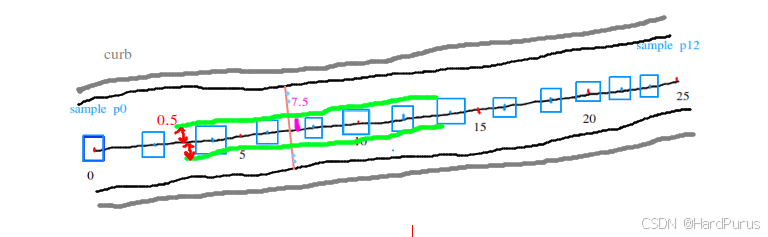
const double adc_width =
      VehicleConfigHelper::GetConfig().vehicle_param().width();
从配置文件modules/common/data/vehicle_param.pb.txt获取车辆的宽度,这个配置文件中存储了车辆自车的一些数据
const Vec2d left_vec =
      Vec2d::CreateUnitVec2d(ref_point.heading() + M_PI / 2.0);
获取参考路径点切线垂直方向(逆时针)上的单位向量坐标
  auto waypoint = ref_point.lane_waypoints().front();
  double left_width = 0.0;
  double right_width = 0.0;
  waypoint.lane->GetWidth(waypoint.s, &left_width, &right_width);
  const double kEpislon = 1e-8;
  double effective_width = 0.0;

  // shrink width by vehicle width, curb
  double safe_lane_width = left_width + right_width;
  safe_lane_width -= adc_width;
  bool is_lane_width_safe = true;

  if (safe_lane_width < kEpislon) {
    ADEBUG << "lane width [" << left_width + right_width << "] "
           << "is smaller than adc width [" << adc_width << "]";
    effective_width = kEpislon;
    is_lane_width_safe = false;
}获取车道宽:查询地图获取当前点距离左右车道线的距离。
扣除车宽:
safe_lane_width代表的是除去车辆自身宽度后,剩余的可移动空间
double center_shift = 0.0;
  if (hdmap::RightBoundaryType(waypoint) == hdmap::LaneBoundaryType::CURB) {
    safe_lane_width -= smoother_config_.curb_shift();
    if (safe_lane_width < kEpislon) {
      ADEBUG << "lane width smaller than adc width and right curb shift";
      effective_width = kEpislon;
      is_lane_width_safe = false;
    } else {
      center_shift += 0.5 * smoother_config_.curb_shift();
    }
  }
  if (hdmap::LeftBoundaryType(waypoint) == hdmap::LaneBoundaryType::CURB) {
    safe_lane_width -= smoother_config_.curb_shift();
    if (safe_lane_width < kEpislon) {
      ADEBUG << "lane width smaller than adc width and left curb shift";
      effective_width = kEpislon;
      is_lane_width_safe = false;
    } else {
      center_shift -= 0.5 * smoother_config_.curb_shift();
    }
  }
上面是路沿(马路牙子)避让逻辑,普通的车道线(虚线)压一点没关系,但路沿是物理障碍,必须保留安全距离
右侧是路沿:
从安全宽度中扣除 curb_shift,curb_shift是从modules/planning/planning_component/conf/discrete_points_smoother_config.pb.txt文件中获取到的配置项默认是0.2
中心点左移量:center_shift += 0.5 * curb_shift
解释:因为右边可行驶区域变窄了,所以该区域的“中心”需要向左移动,才能保证驾驶安全
左侧是路沿:
从安全宽度中扣除 curb_shift
中心点右移量:center_shift -= 0.5 * curb_shift
解释:因为左边可行驶区域变窄了, 所以该区域的"中心"需要向右移动,才能保证驾驶安全
  const double buffered_width =
      safe_lane_width - 2.0 * smoother_config_.lateral_buffer();
  safe_lane_width =
      buffered_width < kEpislon ? safe_lane_width : buffered_width;
除了避让路沿,还需要在剩余空间两头各预留一个 lateral_buffer,lateral_buffer也是从modules/planning/planning_component/conf/discrete_points_smoother_config.pb.txt文件中获取的,默认是0.2
如果预留缓冲后还有空间,就用缩减后的宽度;如果空间不够了,就尽量维持原状,不再强行缩减
  if (is_lane_width_safe) {
    effective_width = 0.5 * safe_lane_width;
  }

  ref_point += left_vec * center_shift;
  anchor.path_point = ref_point.ToPathPoint(s);
  anchor.lateral_bound = common::math::Clamp(
      effective_width, smoother_config_.min_lateral_boundary_bound(),
      smoother_config_.max_lateral_boundary_bound());
anchor.lateral_bound :通常定义的是从中心点向左或向右的最大允许距离而不是总宽度,所以effective_width取一半
利用之前计算的 center_shift,沿着横向向量 left_vec 移动原始参考点,这确保了锚点位于新的、避让了路沿后的安全区域的中心
left_vec是垂直于原始参考路径点切线方向上的单位向量坐标,乘以center_shift表示偏移量
ref_point += left_vec * center_shift;如果center_shift为正,向左侧偏移一点,如果center_shift为负,则向右偏移一点,最后得到新锚点的坐标
最后将effective_width有效范围控制在min_lateral_boundary_bound(默认0.1)和max_lateral_boundary_bound(默认0.5)阈值之间,
这也就意味着一个锚点的信息中比较重要信息是:调整后锚点坐标和左右有效行驶范围
这样GetAnchorPoint函数就分析完了
  for (const double s : anchor_s) {
    AnchorPoint anchor = GetAnchorPoint(reference_line, s);
    anchor_points->emplace_back(anchor);
  }
  anchor_points->front().longitudinal_bound = 1e-6;
  anchor_points->front().lateral_bound = 1e-6;
  anchor_points->front().enforced = true;
  anchor_points->back().longitudinal_bound = 1e-6;
  anchor_points->back().lateral_bound = 1e-6;
  anchor_points->back().enforced = true;
上面逻辑会为每个采样点,都构建一个锚点数据,然后把所有锚点数据存入anchor_points中,并且对生成的锚点列表的第一个点(起点)和最后一个点(终点)应用严格的,近乎固定的约束,这样可以确保平滑后的路径的首尾位置高度精确,使车不会在起点和终点出现晃动的情况.
smoother_->SetAnchorPoints(anchor_points);将获取到的锚点,注意这里是一条扩展参考线上的所有采样后的锚点,设置到参考线平滑器中
这里默认使用的是discrete_points_smoother平滑器,平滑器的配置在modules/planning/planning_component/conf/planning.conf文件中
--smoother_config_filename=modules/planning/planning_component/conf/discrete_points_smoother_config.pb.txt